DIY Glue Pad
Step up your stamping game with this must-have. You probably even have everything to make it already in your home!
Supplies and Materials:
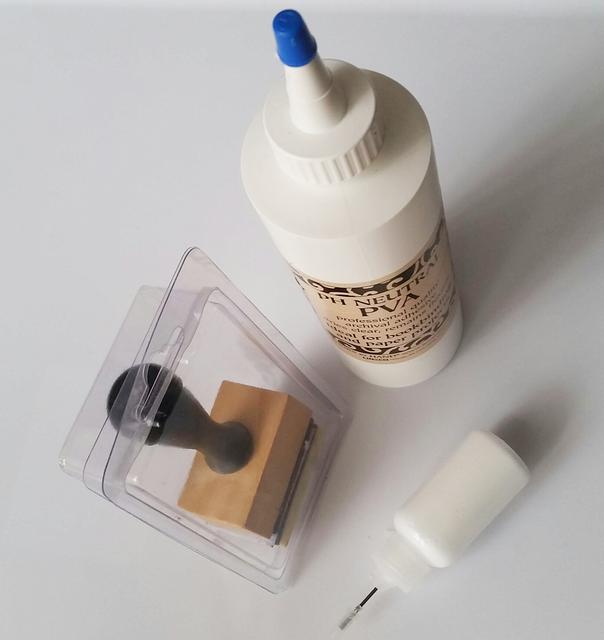
-A new, foam sponge or foam "ink blending" tool (such as Ranger's Ink Blending Tool)
-An airtight storage container, big enough to hold your sponge/ink blending tool.
-0.5 oz. empty bottle (to store a small amount of adhesive for refilling your pad)
Recently I purchased a glue pad for my stamping and I totally love it - It's a must have! But it was almost $10 and it was so simple, it seemed like there should be a cheaper alternative. I looked on Pinterest, but found nothing, so set out to make my own out of trial and error, with supplies I had on hand in my home.
I first tried this project with a more porous sponge, the type I use in my kitchen. It worked okay, but it dried up after only a couple of days! It also didn't apply the glue very evenly. But if you're in a pinch, and it's your only option, it works okay. Just make sure you carefully touch the sponge to the rubber stamp several times so it gets a solid coverage. And don't plan on using the same sponge for more than a few days. If a regular kitchen sponge is your best option, it might be easiest to cut the sponge into 1" cubes and dispose of them after each use.
Next I tried an ink blending tool with a foam sponge. It worked amazing! If your budget allows for it, I suggest purchasing one of these! It's less than half the price of a purchased glue pad kit and will cost even less for refills! The handle made it easy to work with and the small, fine pores applied the glue evenly to the stamp. (I even like this one more than the glue pad that I purchased! It's so easy to use!)
Once you have your sponge, liquid adhesive, mini glue bottle and air tight container, you're almost done! Add three drops of water to the 0.5 ounce glue bottle and fill the rest of the bottle with adhesive. Shake well. This will help keep the sponge more moist and the glue easier to spread. Don't worry! It will still hold things like glitter and flocking great!
Use the applicator on the mini glue bottle to evenly spread glue all over the surface of the sponge. I like to use Books by Hand's PH Neutral PVA glue. It is safe for archival projects and dries clear but flexible. If you're using a kitchen sponge and it has an abrasive side, apply the glue to the opposite side, since it's easier and more stable to hold it from this side.
That's it! It's that easy! Store your sponge in the airtight container when not in use. Apply more glue to the pad as needed. If your glue pad completely dries up, you may be able to rinse it out with hot water, depending on the glue you used, and start again. Or skip the mess and just swap it out for a new sponge and reapply adhesive (less than $1 in supplies!)
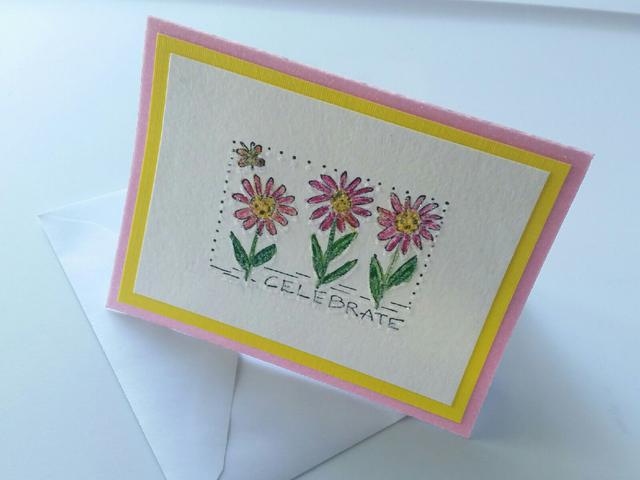
Use your glue pad to add layers to your stamped images by first stamping in a solid color then coloring the image in (with watercolor pencils for example), then finish up by re-stamping the image in glue and sprinkling with glitter or flocking!

Glue Pad DIY

You might
also enjoy...


Disclaimer: Please note that some of the links in this post are affiliate links. There is no additional cost to you, but The Scrap Room will earn a small commission should you choose to purchase through those links. Thank you for helping support our business!