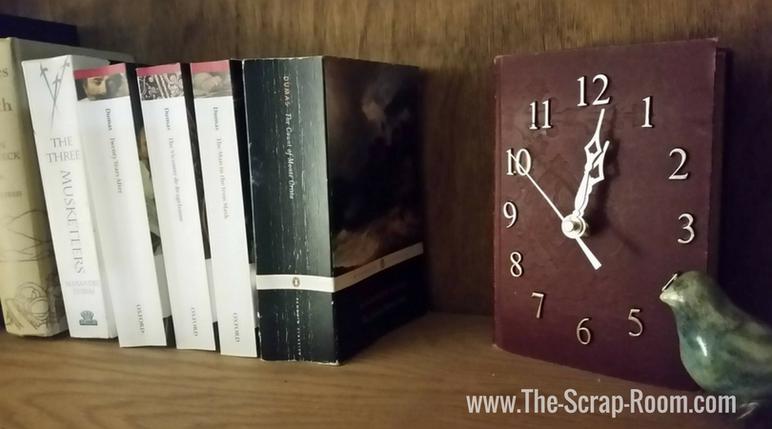
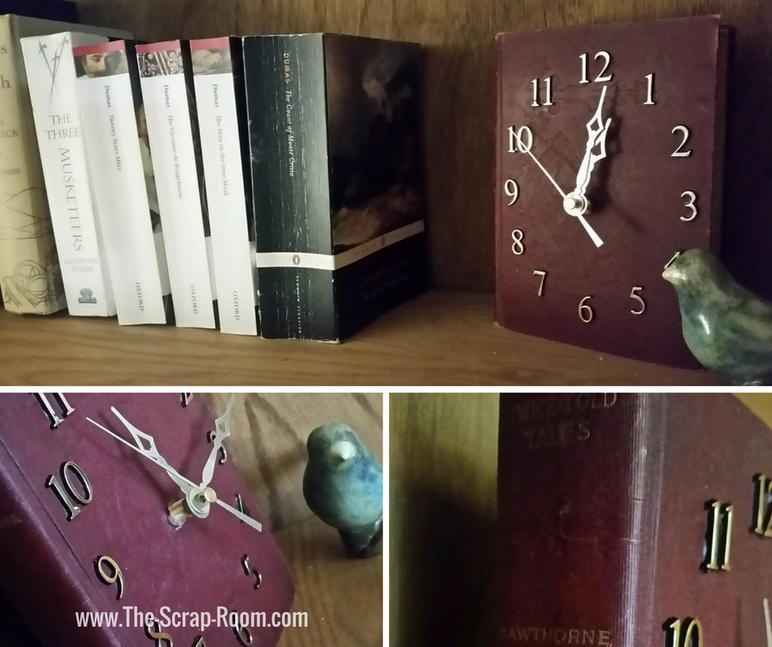
DIY Book Clock
Twice Told and now Re-purposed, this 100+ year old book can keep up with the times!
Now here’s a unique piece of art that ought to be on every book lover’s shelf! A one-of-a-kind gift or a treat for yourself, this handmade clock is super easy to customize! You can make one in just a couple of hours, so keep *reading*!
*No priceless Classics were harmed in the creation of this clock or tutorial. This copy of Twice Told Tales by Nathaniel Hawthorne was valued at about $10 before I cut into it. Now, to me, it's priceless. ;)
For this project, you will need:
-Hardcover book, at least 1 1/2” inches thick
-Craft Knife and Ruler
-Phillips Head Screwdriver
If you have someone who likes to read on your gift-giving list, I can pretty much promise you they are going to LOVE one of these clocks! They are really easy to customize, so no matter what your intended recipient reads, you can make one that is a perfect match for them! Selfishly, I made the clock in this tutorial for myself, as I myself am a huge bookworm, and have been wanting to try my hands at making a clock for a long time.
I didn’t originally intend to make a book clock. I just wanted to make “a clock”. The project started out a lot more vague than my Twice Told Tales clock. I literally walked around my home, thinking of what I already had that I could upcycle into a clock. At first I walked right past my bookcase. “I would Never cut up one of my beloved books.” But then it dawned on me. I needed to make a book into a clock for this very reason! BeCAUSE they were so important to me!
This didn’t mean I needed to cut up one of MY treasured books, but it got me thinking. And hunting. For the perfect book for the project. Since I’m a big fan of the classics, when I saw this old copy of Nathaniel Hawthorne’s Twice Told Tales at a flea market in Michigan while I was visiting my mom and step-dad, I knew it was a perfect choice! I picked it up for a cool $3.
After doing a little research (I mean, I wasn’t about to just start carving away on a 100+ year old Hawthorne!!!) I found that the book was worth about $10, but for some reason it still didn’t make it any easier to cut into. I was also a little haunted by the name scrawled inside. Who was “Alida” and how would she feel about me cutting into her book? I just couldn’t do it. I left the book sitting out on the corner of my workspace, with every intention of “getting back to it someday”.
I literally stared at this book, nearly every day, for over a year. I couldn’t bring myself to cut it up, but I couldn’t bring myself to tuck it away on my bookcase. (I think I felt that “once it hit the shelf” I’d get too attached and there’d be no going back! And I wanted this book to be my new clock!!)
So this year, as I was wrapping up loose ends and getting ready for the New Year – setting goals, eying new projects – I decided it was time! I busted out the ‘ol craft knife and just started cutting! Within a couple of hours I finished my new clock, and let me tell you, it’s already one of my very favorite pieces of art in my home! I can definitely see myself making a few more of these for some of my book loving friends.
The two main things you’ll need for this project are obviously the book and the clock workings. You’ll also need a couple other basic tools – a craft knife, ruler and Phillip’s screw driver will probably do fine! You could also use a drill, but I didn’t even bother pulling mine out for this project, the screwdriver worked great, was easy, and fast. I have several craft knives, but I used my Fingertip Fiskars knife, with the non-swivel blade for this project. I use this knife for a LOT of things, but it was particularly helpful on this project. Very easy to control the blade and cut through literally HUNDREDS of book pages without too much work!
You can use either a new or old book for this project, you just want to make sure that it’s a HARDCOVER book, and that it’s at least an inch and a half thick. You’ll also need to take into account the length of the hands in the clock kit you are using. I picked up a Walnut Hollow 3-piece clock kit from Amazon for under ten bucks. It’s hands are about 3.5” long, and the clock stem 3/4". The hands will need to be positioned on the cover of the book so that they do not hit the table or shelf the book may be sitting on. If you plan to add a bracket and hang this clock on the wall, this won’t be as big of a concern.
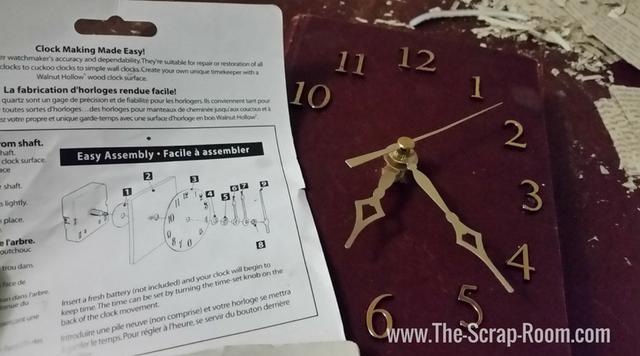
For the clock workings, pick up an easy to use kit that includes all the parts you’ll need. Like I said above, I used the Walnut Hollow 3-piece clock kit from Amazon. It was really easy to use and came with clear and simple instructions. I would (and probably WILL) use this product again! I was sooo happy with not only how quick and easy it was to put together, but the numbers, font and color were all perfect for the style of clock I was going for, and the size of the hands and numbers were just right for my book!
This Walnut Hollow 3-piece clock set is AWESOME! It was sooo easy to use, and I love the look it gives my new book clock. I really thought making a clock would be out of my league but this set really made it easy. I will definitely be ordering more for projects in the future! I’m no Geppetto, but I don’t think it’s too bad for my first clock! If you’ve even been thinking about making your own clock, I really suggest you give it a go! You’ll end up with an amazing piece that you can display in your own home or share as one-of-a-kind gift!
Before you begin cutting into your book, plan out your project from start to finish. Decide exactly where you want the numbers to go, where you want the hands to be centered, etc. There are no do-overs when it comes to cutting the hole in the cover of your book! Make sure you actually lay your clock hands out and imagine them rotating all the way around. If they will extend past the bottom of the book cover, they will hit whatever the finished clock is sitting on.
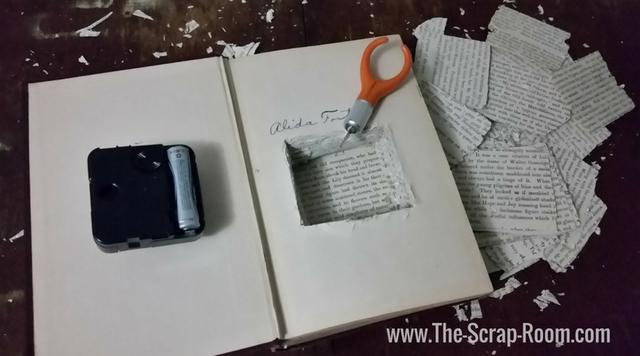
Also, make sure that where you’re going to make the hole in the book cover for the clock workings to go through, is exactly centered! Don’t “eye-ball it”! If you’re off, even a little, it will really show – especially on such a small surface as a book! (No, really, go look really close at mine. 😉 ) Measure the width of your book and mark a small hole right in the center. Use a drill or a Phillips screwdriver to carefully make a hole that is a little smaller than the clock post / stem that comes out of the box that holds the clock mechanism. You can clean up the edge of the hole using a thin strip of sandpaper (just feed it through the hole like floss, and sand any ugly edges down, or use your craft knife to clean it up a little.) Feed the post from the clock kit through the hole, so that the box is on the inside of the book cover. Carefully close the book cover while watching the clock mechanism, you’ll see right away why you’ll need about a 1/4” or so wiggle room on either side of the box! (Okay, now remove the clock box…this page cutting process is going to take a little while and it’ll just be in the way!)
Measure the length and width of the clock box you are using, and create a quick template using some cardboard from an old box. Cut out a piece of cardboard that is about ½” wider than the box, but less than ¼” taller. This will allow it to easily fit into the cavity in the book, but still give it about ¼” of extra space to move side to side as the pages shift when the book is opened. Use your ruler to find the center of your new template and poke a small hole.
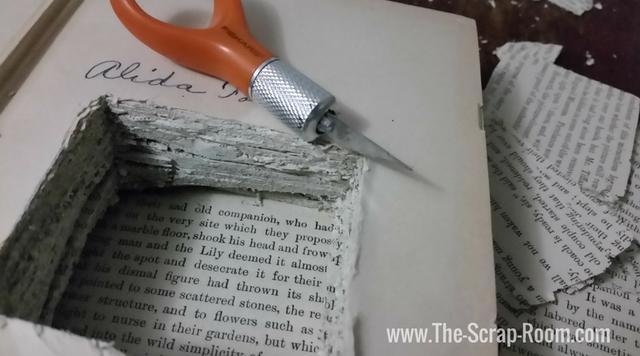
Open the book, and place your template on the inside of the front cover, so that the holes line up, and carefully fold the book closed from the back, so you are staring at the back cover of the book. Holding the book tightly closed, flip it over so you’re looking at the front. You want to be careful that the template doesn't shift. The holes in the template and cover should (hopefully) still be lined up, the book cover facing up. Very carefully, so as not to move the template at all, open the cover of the book. Your template should be resting in just the right spot! Hold it in place, and use your craft knife to trace around it, beginning the cavity which will eventually house the clock workings.
Take your time and be patient with this part otherwise you can bunch or rip the fragile pages. If the pages you are cutting are too delicate, and you find them tearing and leaving you with rough edges, try using a ruler pressed down firmly, over the part of the page you Don’t want to remove, to hold them in place while you cut. Once you have cut through a couple dozen pages, you’ll create a “wall” that can guide your future cuts and you can ditch the template… You may still want to press the ruler down on the edge of where you’re cutting though.


Basically the concept is really simple – punch a hole in the cover, carve out a hole that fits the mechanical clock box, add the clock kit to the book, and sit back and enjoy! However it wasn’t quite that simple, so I decided to write up a full tutorial on it so you don’t have to make the same mistakes I did. 😉
For starters, when you open and close the book – which you’ll need to do to adjust the time on the clock or to replace the battery, the mechanical box that houses the clock workings will need to have a little wiggle room. As you open and close the cover of the book, the book spine will bend and the pages will shift. (This is also why I don’t recommend gluing the pages together, even if it might see like it would make the book more “stable” or “solid” -- unless you're planning to hang it, then see gluing tips later in the tutorial.) I originally cut out a cavity the size of the box and had to go back and widen the cut-out slightly. It doesn’t however, need much wiggle room on the top and bottom – in fact, the less movement up and down it has, the better! Ideally, when the clock it sitting up on display, you want the clock box to rest comfortably on the cut out cavity, like a book on a bookshelf.
How deep you need to cut into the book’s pages will depend on the size of your clock workings, and how much space you want between the cover of the book and the rotating hands. You’ll at least need to leave room for the hands to clear the raised numbers. If your book is only an inch or so thick (like mine), you probably won’t have much of a choice. You’ll probably need to cut through a majority of the pages, and you might not get to be too picky about how much space is between the cover and clock hands. If your book is thicker, you can cut a cavity that is a little deeper and the gap will be smaller. Mine has about a ½ inch of space. I cut through all but the last couple chapters of the book, and there’s about ¼” of space on the inside, between the inside cover and the little box that the clocks mechanical components are in.
If you cut the right size hole, in the right place, when you set the book up on it’s side with the clock workings inside the carved cavity, and the stem through the hole in the cover, the black box should rest perfectly in it’s place, and you won’t need to do anything else, but finish assembling the clock.
If you are a little off, you may have to cut a little more space out. If you carved out a little too much room, the black box might be a little wobbly. It’s definitely easiest to do it right the first time, but should things not line up right and you need to add some stability to the clock workings, you can mount the box on a piece of cardboard or chipboard so it sits at the correct height, lining the clock stem up with the hole in the cover.
Once you have the cavity carved, and the clock mechanism in place, with the stem through the hole, all you need to do is add the remaining parts, the battery and set the time! If you’re going to hang it on a wall, you may need to secure the pages a little, but to sit on a table or shelf, you won’t need to do anything else!
To secure the pages a little better to make this into a wall clock, I’d recommend gluing sections of pages together, instead of all of the pages together. For this book, that’s about 1.5” thick, I’d recommend splitting the pages in 2-3 sections, and just “painting” the outside edges with some rubber cement. (Btw, this technique – with the rubber cement on the edges – works GREAT for making your own tear-top paper pads! 😉 ) I wouldn’t recommend flipping through the pages and gluing the face of each one individually – this will cause the pages to wrinkle for sure! Gluing around the edges will allow you to easily flip the book open to access the inside clock workings, without causing moisture damage or putting unnecessary strain on the pages, book spine or clock workings.
You might
also enjoy...
Disclaimer: Please note that some of the links in this post may be affiliate links or ads. There is no additional cost to you, but The Scrap Room will earn a small commission should you choose to purchase through those links. Click here for my full disclaimer. Thank you for your support.