Jewelry Shadow Box

You might
also enjoy...

If you enjoyed this tutorial or found value in it, we'd love it if you'd give us a thumbs up or a share on Facebook or Pinterest!
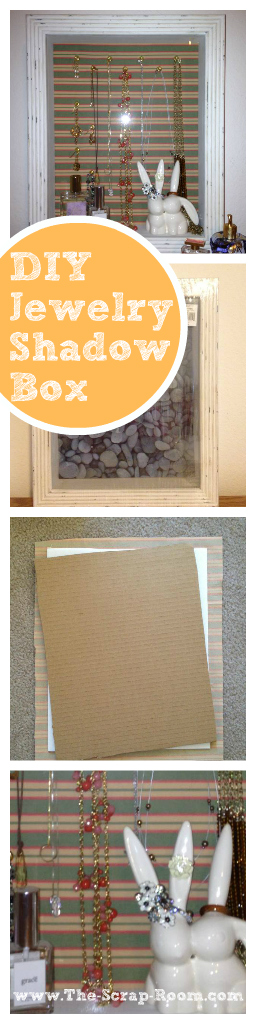
DIY Jewelry Shadow Box
Need a clever way to store your jewelry? How about a place to store and display it? This step-by-step tutorial will guide you from start to finish! A perfect solution if you have limited storage space or just want a cute jewelry organizer for your favorite accessories!
For this project you will need:
-**11" x 14" Shadow box
-Cardboard piece the same size as your box (nothing fancy required here -- I used part of an old box that I got in the mail)
-Craft knife or Box Cutter (This is for cutting the cardboard. I recommend using a box cutter to save your craft knife blade! I usually borrow one from my sweetie, he uses this one.)
-Scissors
-Iron
-Hot glue gun and glue sticks
Begin by unwrapping and removing the plastic from your shadow box. **If you want your display to have a glassed-in front, be sure to pick up a "hinged shadow box" so you can open it and close it easily. I've shared a few I like above. If you are on a tighter budget or don't want a glassed in display, you can purchase an open shadow box, or remove the glass panel. This display I made had a hinged front and measured 11" x 14".
Flip your box onto its front and use your flat head screw driver to gently lift the prongs that hold the back of the box in place. Remove the back and the foam piece beneath it.
Using your craft knife or razor blade, cut a tiny sliver (about 1/8") off the top and right side of the foam, then cut a piece of cardboard to match it in size. We are scaling these down in size so they'll fit into the box after we've covered them with fabric.


Now cut your fabric to size; it should be about two inches wider and longer than the size of your box. After ironing your fabric, place it face down on your work surface and place the foam on top of it (also facing down).


Snip off the corners of the fabric and use your glue gun to adhere all four sides to the back of the foam. If you use hot glue for other projects and can afford the splurge, I highly recommend the SureBonder Pro 2, and it's Glue Gun Nozzle Assortment set (that can be purchased separately). The tip set has nozzles for a variety of uses, but the flat nozzle works great for this craft project! It will allow you to add a thinner bead of glue so it will be easier to put everything back together and help things lay flush. Once the glue is dry, place it back into the shadow box, being careful not to snag the fabric on the prongs.

Next place your cardboard on top of the foam, followed by the back of the shadow box. Press down lightly and bend the prongs down. Note that they will not likely bend as far as they were originally since we have added depth to the shadow box's backing.
Now that everything is back in place, it's time to add the hooks. Select one of your hooks and determine where you would like it located, then twist it through the foam and into the cardboard behind it. (Now you know why we added the cardboard! The first time I attempted to make a shadow box, the foam was too shallow and the wood behind it was too firm... it did not work!) I didn't measure before I placed my hooks since there are straight lines on my fabric, but you can use a ruler if you aren't comfortable eyeballing it. I placed seven hooks across the top in a zig zag pattern, and four down the side for shorter items like bracelets. 1/2" cup hooks work great for this project, or a little bigger if you have heavier or larger jewelry to hang. Most of my accessories were small and light weight so I used 1/2" hooks. This set of hooks is a great value and comes in a variety of sizes (25 hooks of each) so plenty of hooks for this project and more!

This box was deep enough that it could accommodate my Creative Co-Op Ceramic Bunny Rabbit Ring Holder and a couple of my favorite perfumes! Now I can see all my jewelry at a glance and I don't have to worry about them tangling up in a box!


Disclaimer: Please note that some of the links in this post are affiliate links. There is no additional cost to you, but The Scrap Room will earn a small commission should you choose to purchase through those links. Thank you for helping support our business!